If you want to be physically fit and healthy, you need to make sure your back stays strong and in good shape. Finding the time and resources to go to a gym or fitness center might be difficult. As luck would have it, you only need a few basic items to perform a number of highly efficient back exercises in the comfort of your own home.
If you want to develop your back muscles without having to go to the gym, this article will show you nine back exercises you can do at home with minimal or no equipment.
We’ve got a wide variety of workouts for your back, from the standard push-up and pull-up to the more obscure reverse snow angel and T raise. Exercises like these can help everyone, from health-conscious athletes to those seeking relief from chronic back pain and better posture.
1. Bodyweight Rows
Strengthening the lats, traps, and rhomboids with bodyweight rows is an excellent way to achieve this goal. Strong horizontal bar, preferably at waist level or lower, is required for this exercise. You can also use a broomstick in between two chairs, a park bench, or a sturdy table.
How to Perform
- Find a strong horizontal bar or other elevated surface to support your weight. You can utilize a Smith machine, TRX, or other secure surface at waist height.
- Your body should be a straight line from your heels to your head.
- Keep your body upright by bracing your core and engaging your shoulder blades.
- By bending your elbows and tightening your shoulder blades, pull your chest towards the bar. Touch your chest to the bar or handles with your elbows close to your body.
- Pause at the top of the exercise, then slowly descend your body to the starting position while engaging your core and shoulder blades.
- Do the movement as many times as you want.
Variations
- Raising the bar or surface or bending your knees to flatten your feet will make the workout simpler.
- Lower the bar or surface or raise your feet on a bench or box to make it difficult. Weight vests and breast plates can also add weight.
Tips
- Don’t let your hips or back arch as you perform the exercise; instead, keep your body in a straight line.
- At the peak of the movement, concentrate on drawing your shoulder blades together and in.
- To avoid momentum, slow your drop back to the starting position.
2. Resistance Band Pull-Aparts
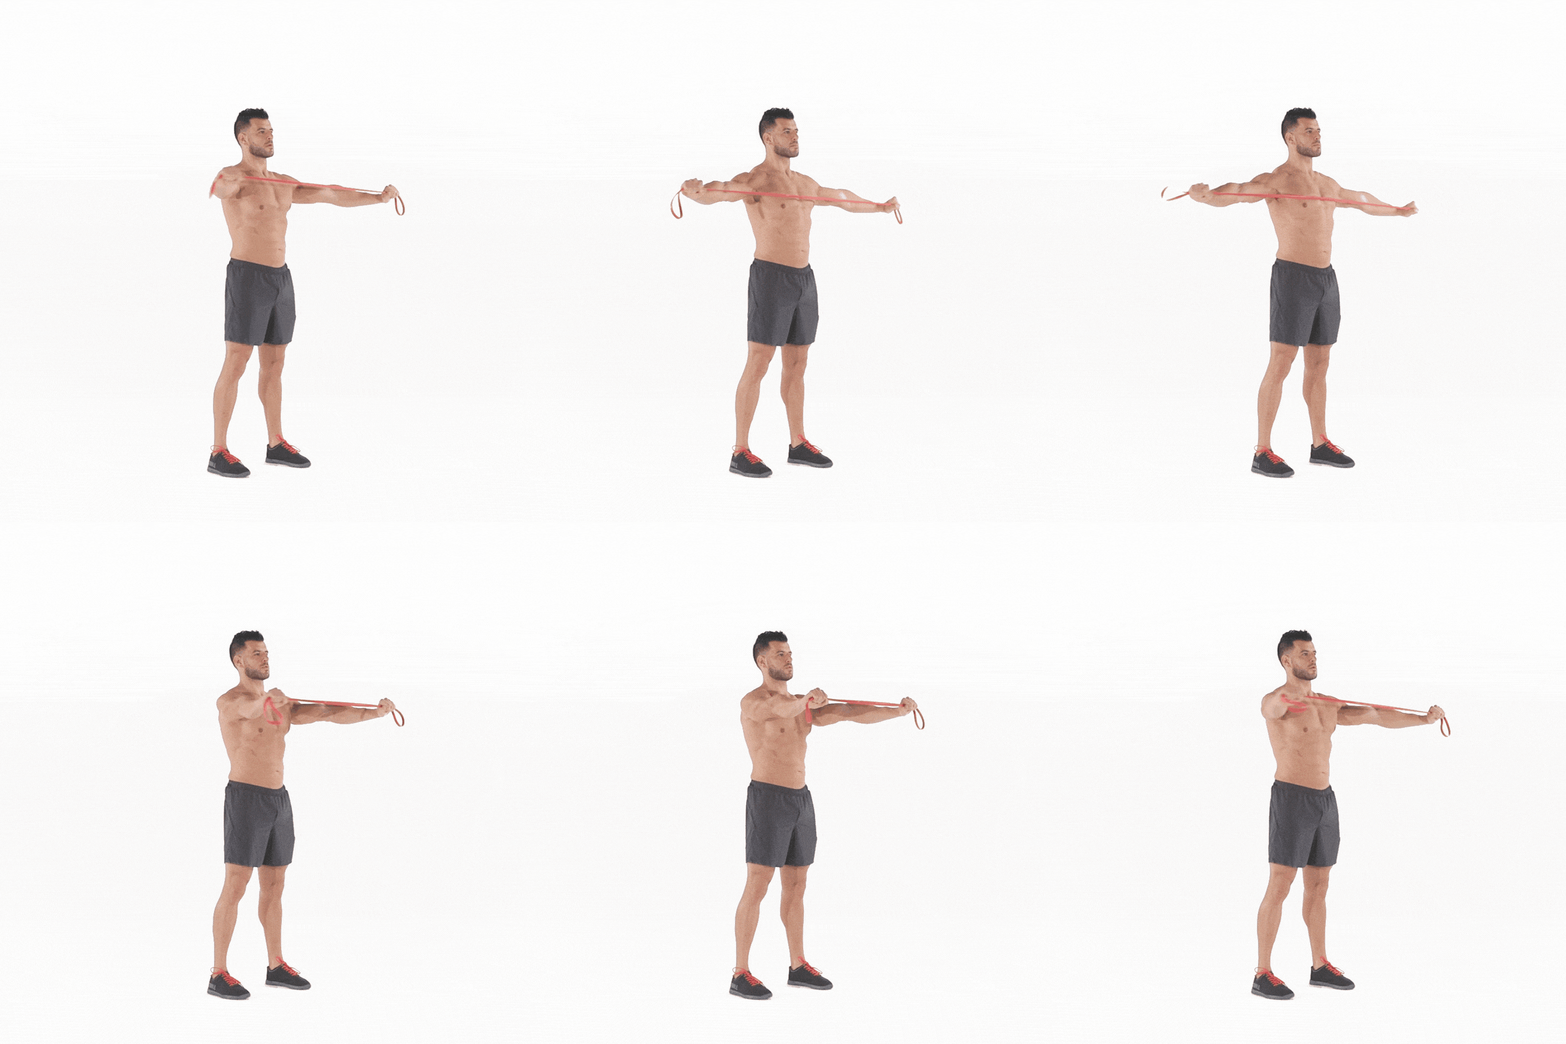
To strengthen the muscles of the upper back and enhance one’s posture, resistance band pull-aparts are an excellent exercise. You’ll want a resistance band for this workout.
How To Perform
- To begin, find a resistance band whose tension suits your current fitness level. Keep your hands shoulder-width apart while you hold the band with both of them, palms down.
- Have a good, tall stance with your feet hip-width apart and your abs tight. Keep your arms extended in front of your chest and the resistance band in front of your body.
- To begin, stand with your feet shoulder-width apart and your arms at your sides. Pull the band apart horizontally and out to the sides of your body. You should be able to pull the band up to your shoulders.
- Once you’ve reached the conclusion of the exercise, pause for a second before slowly bringing your arms back to the starting position in front of your chest.
- In order to achieve the appropriate amount of reps, you must repeat the action.
Variations
- Choose a resistance band with less tension, or move your hands closer together on the band, to make the workout more manageable.
- You can increase the difficulty of the workout by using a higher tension resistance band or by spreading your hands further apart on the band.
- Changing the angle of the resistance band pull-apart, such as by pulling the band apart on the diagonal, is also possible.
Tips
- Make sure your abdominals are tight and your shoulders are down the whole time.
- At the very conclusion of the motion, squeeze your shoulder blades together to fully engage your upper back muscles.
- You should not lean forward or arch your back as you perform this exercise.
Also See: 8 Shoulder-Strengthening Exercises to Avoid Swimmer’s Shoulder
3. Superman
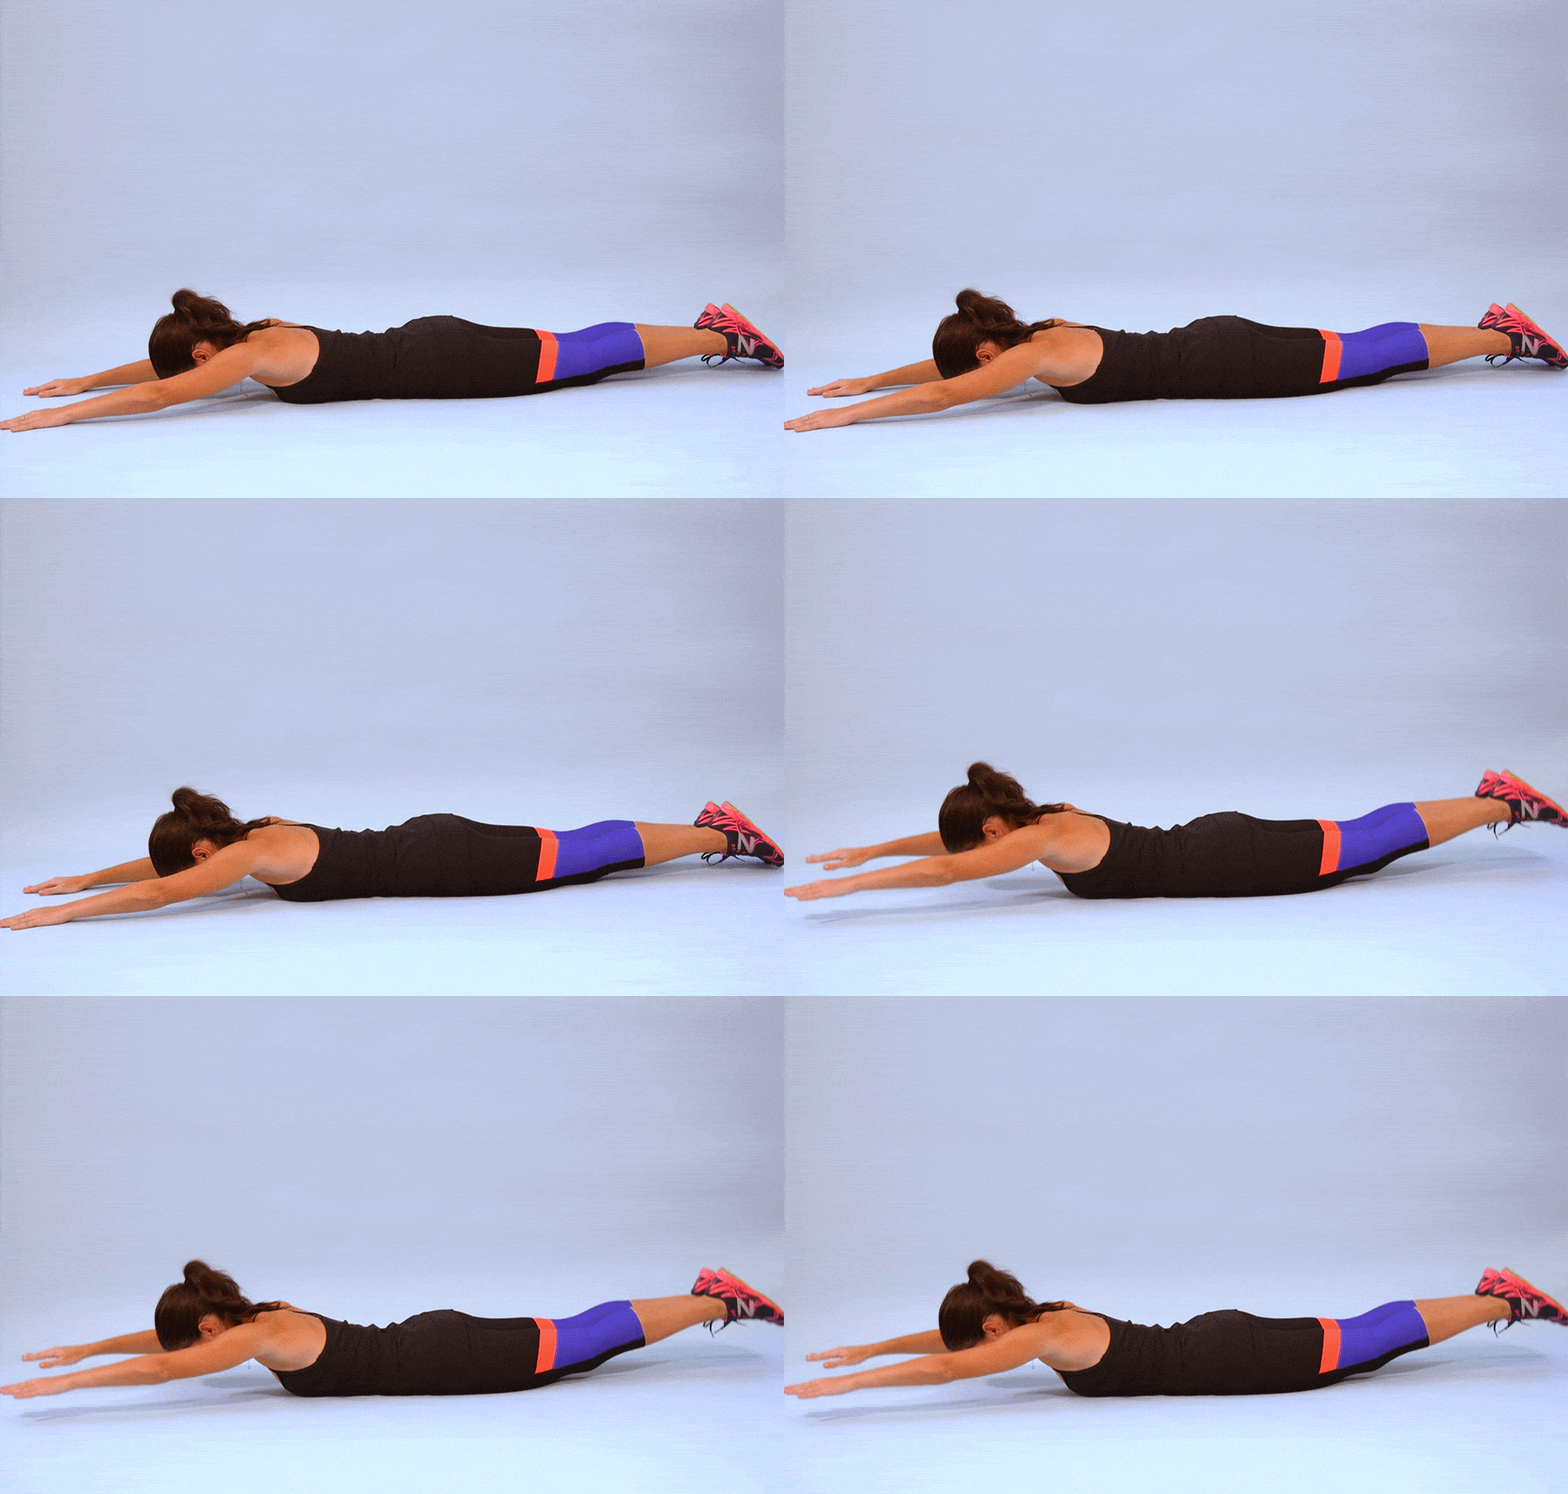
Repetitive Supermans are an excellent way to build strength in the abdominal and lower back muscles. You will need a mat or something comfortable to lie on for this exercise.
How to Perform
- Put your face down on a mat or the floor and extend your arms straight in front of you.
- Contract your abs and thighs and push off the ground with your arms, chest, and legs at the same time. Maintain a straight body posture throughout the exercise.
- Inhale deeply at the peak of the movement, hold for a second, then exhale gently as you return your arms, chest, and legs to their original positions.
- In order to achieve the appropriate amount of reps, you must repeat the action.
Variations
- The exercise can be performed with either the arms or legs lifted off the ground, rather than both at once, to reduce the difficulty.
- Hold the highest position of the action for a longer time or use a light weight in your hands or ankle weights to increase the difficulty of the workout.
Tips
- Maintain a straight, neutral neck and don’t glance up or down as you move.
- To maximise the activation of your lower back, glutes, and hamstrings, you should perform this exercise with your arms and legs at a right angle throughout.
- To prevent hyperextension and strain on the lower back, avoid raising your arms and legs above shoulder level.
4. Plank
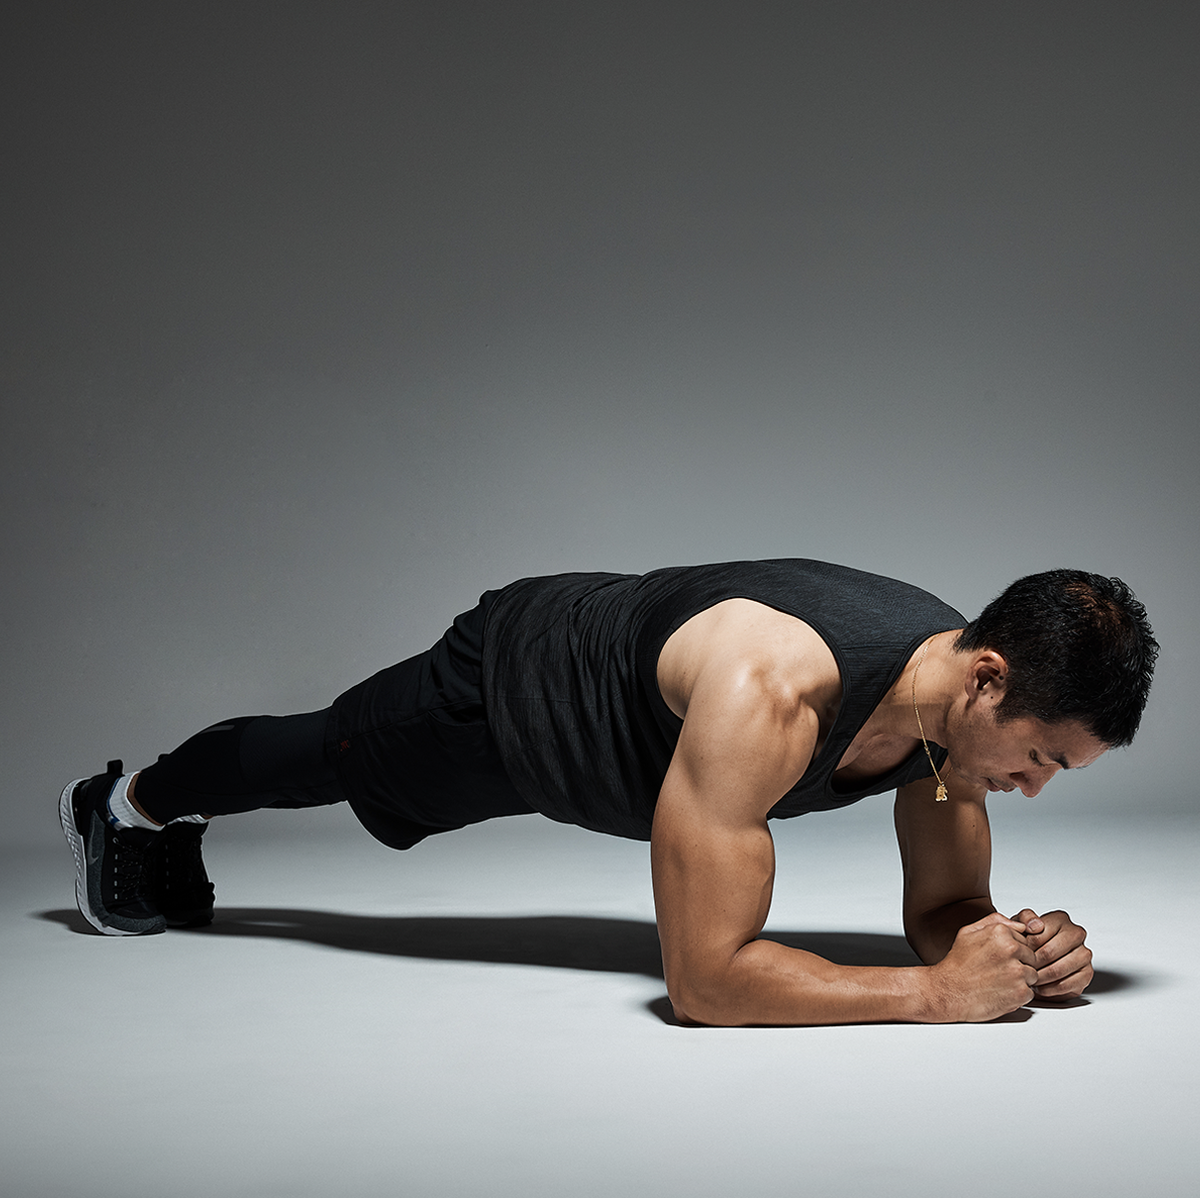
Planks are a fantastic exercise for building strength in the lower back, upper back, and core. A mat or other comfortable bed for lying on is required for this workout.
How to Perform
- Start in a push-up position, with your hands shoulder-width apart and your arms straight.
- Drop your forearms to the ground, so that your elbows are directly beneath your shoulders. Your palms should be facing down and your arms should be parallel to each other.
- Spread your legs out in back of you and prop yourself up on the tips of your toes.
- Maintain an upright posture and a strong core. Maintain a flat back and a straight line from hip to shoulder.
- Maintain this position for as long as you can, up to 60 seconds.
- Once you’re done, you should rest by putting your knees on the floor.
Variations
- Side plank: Start in a plank position and rotate to one side to balance on one forearm and one foot. Your head-to-toe line should be straight. Hold for 60 seconds before changing sides.
- Elevated plank: Hands on a step, bench, or medicine ball. Plank with your feet on the ground and your hands on the elevated surface. This will test your core and upper body.
- Forearm plank with leg lifts: Start in a forearm plank and elevate one leg a few inches. Hold briefly before lowering and repeating with the opposite leg. This variation targets glutes and lower back.
- Plank with knee-to-elbow: . Hold for a moment before starting again. Alternate sides. This variation works your obliques.
Tips
- Maintaining good technique and reaping the full benefits of an exercise requires constant attention to the abdominals.
- To prevent neck discomfort, keep your head in a neutral position, looking a few inches in front of your hands.
- Reduce stress on your shoulders by keeping them relaxed and low, away from your ears.
- Maintain a steady rate of nasal inhalation and mouth exhalation during the entire workout.
- It’s important to keep your hips in line with your shoulders and not let them sink, as this might cause strain on your lower back.
- Beginners should begin with shorter plank holds and work up to longer ones as their core strength increases.
- To avoid raising your blood pressure and decreasing the oxygen supply to your muscles, don’t hold your breath while performing the plank.
- Stretching after a plank training is essential for avoiding muscle discomfort and maximizing the benefits to your flexibility.
5. Single Arm Dumbbell Rows
Dumbbell rows performed with one arm are an excellent exercise for developing strength in the lats, traps, and rhomboids of the upper back. The use of a dumbbell or other suitable weighted object is recommended for this exercise.

How to perform
- Start with a dumbbell in one hand and feet hip-width apart.
- Bend forward at the hips until your torso is nearly parallel to the ground and hold your opposing hand on a bench, chair, or other strong surface.
- Pull the dumbbell towards your chest with your back straight and elbow near to your side. Pull using your back, not your arm.
- Pause at the apex of the movement, then slowly drop the weight to the start.
- Switch sides after 8-12 repetitions.
Variations
- Inverted row: Instead of using a dumbbell, use a barbell or TRX suspension trainer to perform rows while lying on your back.
- Renegade row: This exercise involves holding a plank position with the dumbbells in your hands, then rowing each arm up while maintaining the plank.
- Kneeling single arm row: Perform the row exercise while kneeling on a bench, with the supporting hand on the bench and the rowing arm holding the dumbbell.
6. Reverse Snow Angels
In order to strengthen the muscles in your upper back and improve your posture, try doing some reverse snow angels. You will need a mat or something comfortable to lie on for this exercise.

How to perform
- You should be on your stomach with your arms outstretched and palms down.
- Raise your arms and legs off the floor at the same time, making sure they stay in a straight line with the rest of your body.
- As if you were building a snow angel while lying on your back, move your arms and legs up and down in opposite directions.
- Maintain a straight posture with your neck and head in a neutral position, and use your abs to hold you steady.
- Repeat the motion many times, and then bring your arms and legs back to the floor.
Variation
- Resistance Band Reverse Snow Angels: To increase the difficulty and work your glutes and hip muscles, wrap a resistance band around your feet or ankles.
- Single Leg Reverse Snow Angels: To increase the intensity of the workout for your glutes and hamstrings, try performing it with one leg lifted off the ground.
- Prone Cobra: Begin in a position similar to doing reverse snow angels, but instead of moving your arms and legs, elevate your chest and arms off the ground while squeezing your shoulder blades together.
Tips
- Maintain appropriate form and move slowly.
- Engage your core muscles throughout the workout to prevent injury.
- Lift your arms and legs and exhale as you lower them.
- Start with lesser weights or resistance bands and gain strength.
- As you get stronger, add repetitions. If you’re uncomfortable, don’t push yourself.
- Reverse snow angels should be part of a full-body workout, not the only activity. Include other muscle-group-targeting workouts.
7. T Raises
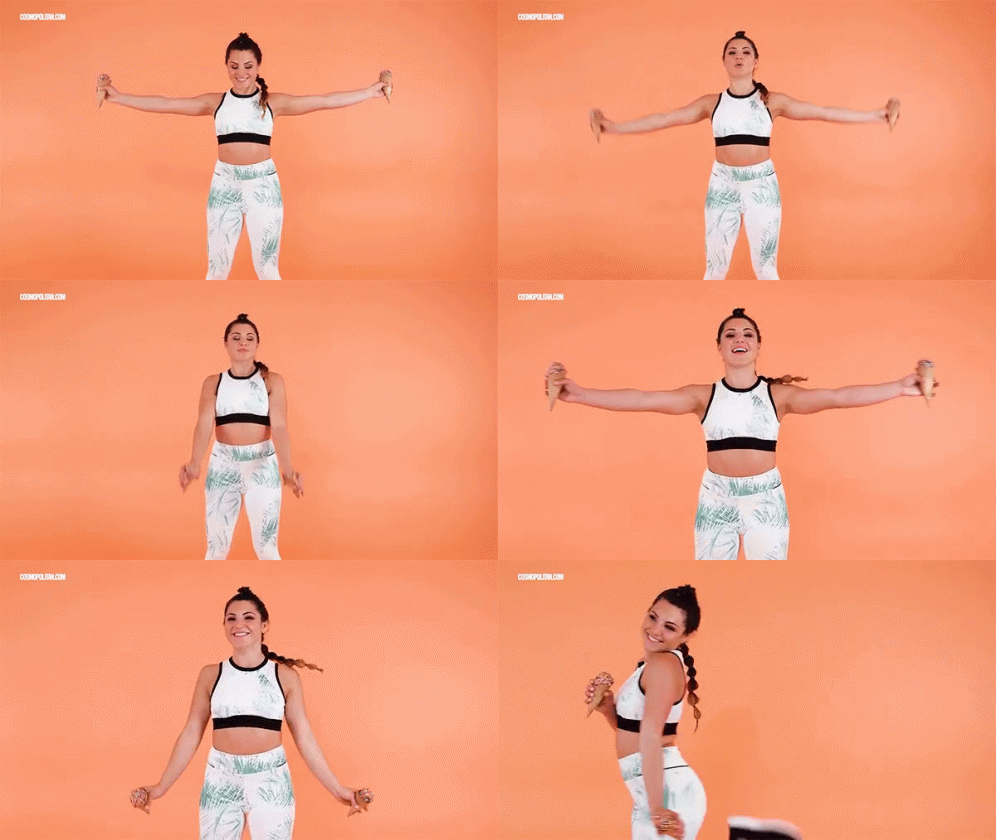
T-raises are a fantastic exercise for building strength in the upper back and fixing poor posture. Light dumbbells or something else of similar weight is required for this exercise.
How to perform
- Hold a little weight in each hand and stand with your feet hip-width apart. You can use anything you have on hand, such as water bottles, dumbbells, or even your own body weight.
- Form a “T” shape with your body by extending your arms out to the sides. In this position, your hands should face down and your elbows should be slightly bent.
- Raise your arms in a “Y” shape above your head while keeping them straight.
- Keep the arms in that posture for a couple of seconds, and then bring them back to the starting position.
- You should aim for 2-3 sets of 10-15 repetitions.
Variation
- Lateral Raises: This is a variation on the T raise in which the arms are raised straight out to the sides rather than at an angle. With this version, we shift our attention to the outer (lateral) aspect of the shoulder blades.
- Front Raises: The frontal (anterior) aspect of the shoulders is targeted by this exercise, in which the arms are raised directly in front of the body.
- Arnold Press: This exercise combines a shoulder press with a T raise, helping to target all three heads of your shoulders.
Tips
- Be deliberate and slow in your movements; your focus should be on keeping your form intact as you work out. Don’t flail your arms around or hunch your back.
- Begin with a weight that allows you to complete 10-15 reps of T raises without difficulty.
- It’s important to use your core muscles throughout the exercise to keep your body stable and avoid injury.
- Take a deep breath in as you drop your arms, and a deep breath out as you raise them.
- Although T-raises are beneficial, they shouldn’t replace a more comprehensive workout. Alternate your routine with other types of workouts that work different muscle groups.
8. Bridges
Lower back, glute, and hamstring muscles can all benefit greatly from regular practice of the bridge exercise. You will need a mat or something comfortable to lie on for this exercise.
:max_bytes(150000):strip_icc()/glute-bridge-f18ea3dea1f9427a82688d1669701b17.gif)
How to perform
- Place your hands behind your head and your knees bent, with your feet flat on the ground and your hips apart.
- Suppress your palms and rest your arms at your sides.
- Make sure your body is in a straight line from your shoulders to your knees by activating your core and squeezing your glutes to raise your hips off the floor.
- After two seconds, return to the starting posture by slowly lowering the hips.
- You should aim for 2-3 sets of 10-15 repetitions.
Variation
- Single-Leg Bridges: Lifting one leg off the ground and lowering it back down is a great way to target your glutes independently.
- Bridge with Leg Extension: Do a bridge, then raise one leg straight in the air, hold for a few seconds, and slowly bring it down to the starting position. Change which leg you’re working on first.
- Hip Thrusts: In this variation, your upper back is supported by a bench or other elevated surface while your feet remain firmly planted on the ground, very much like in a traditional bridge. With this modification, you may target your glutes with greater intensity by using larger weights.
Tips
- Be deliberate and slow in your movements; your focus should be on keeping your form intact as you work out. Avoid slouching or allowing your knees cave in.
- It’s important to use your core muscles throughout the exercise to keep your body stable and avoid injury.
- To avoid straining your lower back, elevate your hips using your glutes.
- You should breathe in as you lower your hips and out as you raise them.
- Although bridges are beneficial, they should not replace a more comprehensive fitness plan. Alternate your routine with other types of workouts that work different muscle groups.
9. Y Raises
Exercises like Y raises are great for building strength in the upper back, which in turn helps with posture. Light dumbbells or something else of similar weight is required for this exercise.
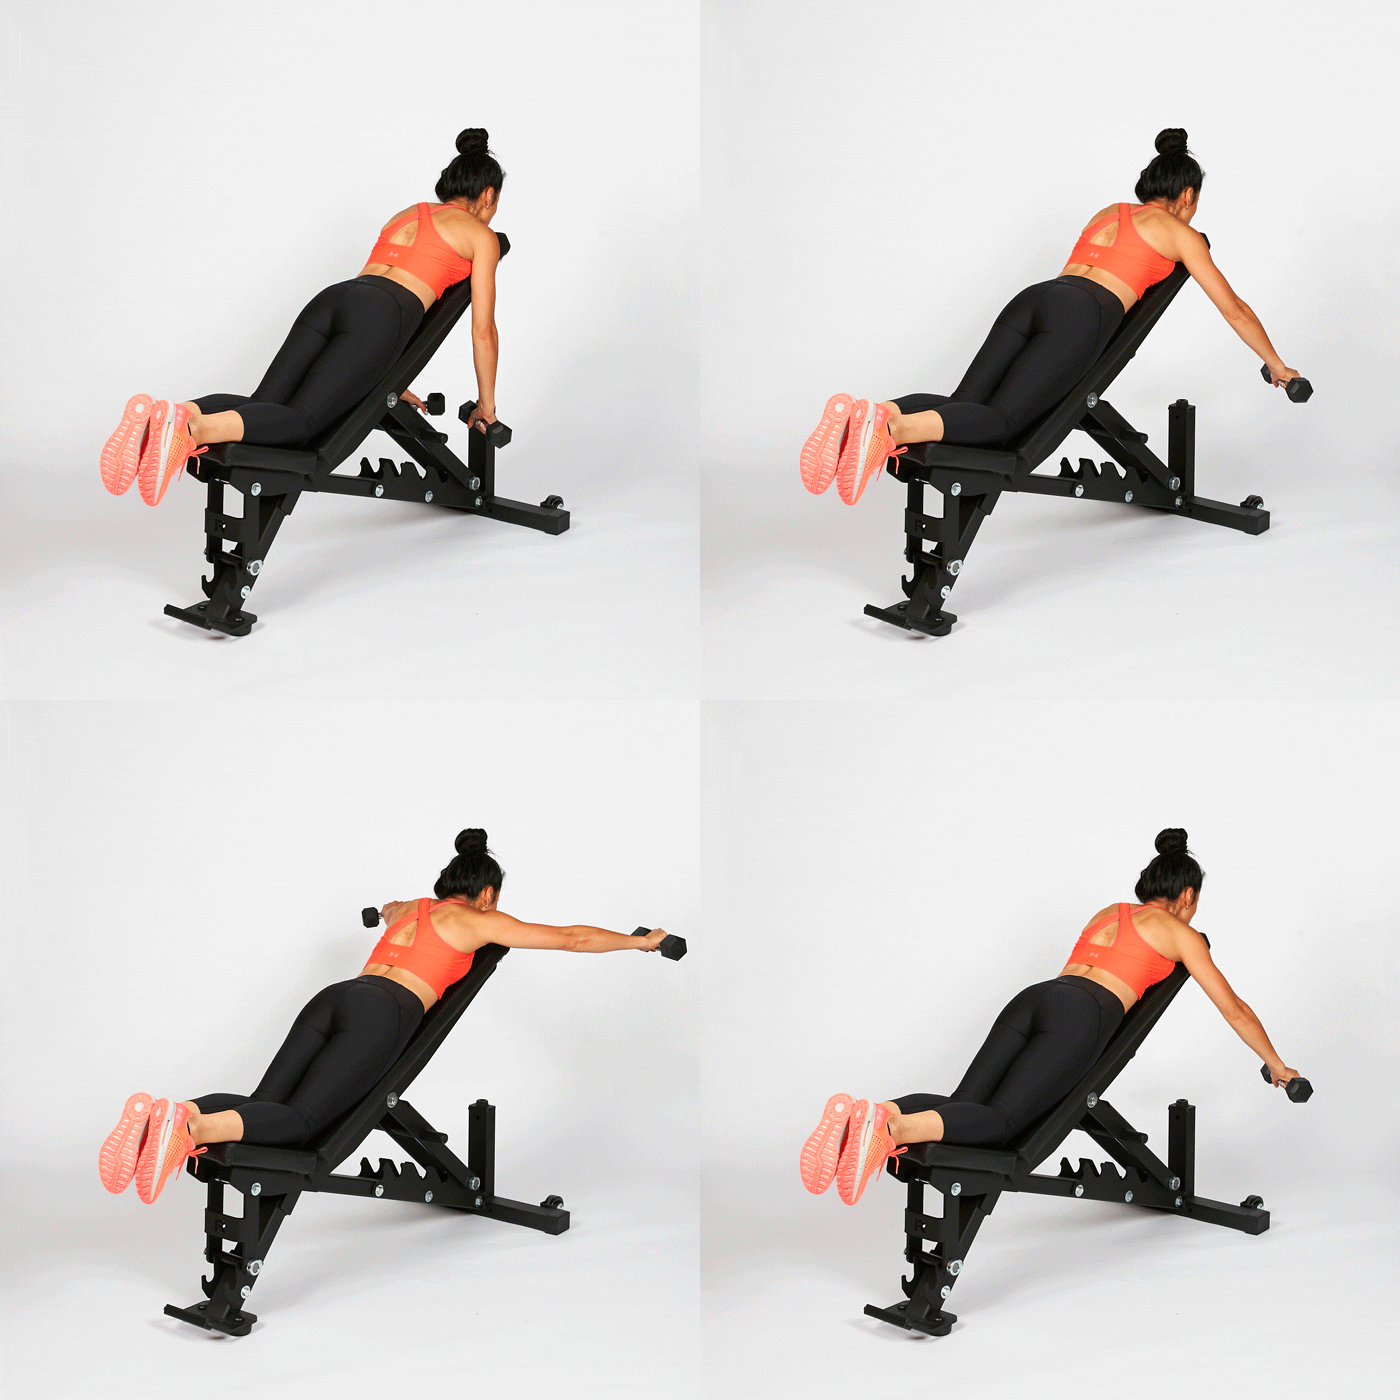
How to perform
- Hold a little weight in each hand and stand with your feet hip-width apart. You can use anything you have on hand, such as water bottles, dumbbells, or even your own body weight.
- Lift your arms in a “Y” formation in front of you. Make sure your palms are facing front and your elbows are slightly bent.
- Hold your arms straight and raise them until they are even with your shoulders. Hold the “Y” shape with your arms.
- Keep the arms in that posture for a couple of seconds, and then bring them back to the starting position.
- You should aim for 2-3 sets of 10-15 repetitions.
Variation
- W Raises: Carry out the same motion as Y raises, but with your arms in a “W” shape.
- T Raises: T-raises are quite similar to Y-raises, except that the arms are in a T shape instead of a Y.
- I Raises: Carry out the same motion as Y raises, but this time with your arms extended straight above your head.
Tips
- You may discover that it’s challenging to do a full range of motion with your chin tuck isometrically at first. Yes, of course! You can ease into a fuller stretch by beginning with a smaller one.
- In order to achieve the desired results from this exercise, you should pull your chin back, rather than craning your neck. Don’t let your head drop below parallel to the floor at any point in the routine.
- Take care not to slouch your shoulders up to your ears; instead, keep them in a natural, relaxed position.
- It’s important to use your core muscles throughout the exercise to keep your body stable and avoid injury.
- Exhale as you lift your chin back, and inhale while you hold the position.


